Monday, September 30, 2013

Laundry Room Face lift Reveal

After eight years of living in our home, I decided it was time to pretty-up my laundry room.

I posted the before pictures here.  Pretty messy and pretty boring.  I had no intention of major overhauls or to spend very much, I just wanted to make it a little more enjoyable room to be in.

Here is the result:


Not a lot of time or money put into it, and I'm liking the result.  

Here's what I did:

1.  Removed the door between the laundry room and mudroom.  There is another a door that leads from the mudroom into the hall, so it really wasn't a necessary door.  The front loading washer requires the door to be left open after using it which meant we couldn't close the laundry room door anyway.  By removing the door, I essentially gained a wall of storage space.  I was able to move the iron and ironing board from the storage room to here where it should be.  I did purchase a new ironing board cover that matched the room better. The old one was probably 25 years old and had ducks on it!  It was definitely in need of replacement.

2.  Added quotes in spray painted old frames and large clothes pins to the same wall.  More information on that can be found on this post.  


3.  Added some baskets that I had laying around to store light bulbs and misc. supplies.  I used the same brown spray paint on the one and the other already matched well enough.  


4.  Added some labels to my sorting bins using some card stock, ribbon and my label maker.

5.  Covered the washer and dryer in contact paper.  Not only does this make it a little prettier, it's also very easy to wipe down.


6.  The biggest impact is from the new paint color.  In our community, we have a paint recycling program.  I was returning my cans and bottles at the local recycling depot, and decided to take a look to see what was there was for paint.  I found a can of this color which was almost the exact color I was looking for.  It was in great condition, about three-quarters full, and free!  


7.  The idea for the color all came from this basket that I won in a raffle.  The paint color looks closer to a match in real life.  The basket is now my lost sock collection spot.  I also added a few other decorative items I had around the house and a small jar for buttons all arranged on an old plastic Ikea tray which I also lined with contact paper.


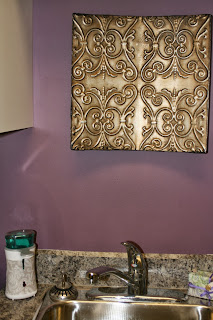
8.  Added these tin decorative panels which used to hang in our half bath.  Visitors always seemed to knock them off the wall, leaving marks and me questioning what they were doing in there.  They did look better hung one above the other, but I think they work okay in here on the separate walls.


9.  Decluttered and organized the cabinet above the washing machine and lined the shelves and back cabinet wall with the same contact paper.  I already had the baskets in there, but for some reason it seems far more organized now.  And I have half an empty shelf, which I'm sure I'll find a use for soon.


10.  Added a dryer rack to the inside of the lower cabinet for wet rags and such.


11.  Re-purposed an Ikea bag holder to use for rags.  I don't use plastic bags much anymore so this holder was also just sitting in the storage room not being used.


Not a lot of work went into this to, but I'm happy with the results.  Total spent was $30 - spray paint ($6), clothes pins ($5), ironing board cover ($10), dryer rack ($1.50) and contact paper ($7).

From this:


To this:


Now can I keep it this clean for long!!!

joann


you may find me linking up here

Monday, September 23, 2013

Fall decor

Fall has arrived.......

I'm not sure whether to be glad or disappointed.  As much as it's a little sad to see our short summer end so quickly, I do like the comforts and routines of fall.

I decided as the temperatures dipped this weekend, it was okay to haul out the bucket of fall decor items.  I typically spread the items out over three or four place around the house, but this year decided to put quite a few of them in one display on the side table in my eating nook.  Maybe if it looks pretty the kids will be less tempted to use it as a dumping grounds (likely wishful thinking on my part, but worth a shot).

I also decided to try making a pumpkin out of some old paperback books as I've seen done by many on pinterest.  Other than the scissor blister on my finger, it was pretty darn easy!


All of the other items were in my stash, just arranged a bit differently than in the past.  I'm happy with it......now on to "fall-up"  the other flat surfaces in my home!

joann

You many find me linking up here

Sunday, September 22, 2013

School lunch menu Week 3

Week 3 of school already!  It doesn't take long to feel like summer break was a long time ago.  We had a very busy week with some of my volunteer work, the kids sport evaluations and homework starting up.  It was sure nice to have my lunch menu already finalized and items in the freezer ready to go.

Here is the kid-approved menu for the past week:


Hopefully this can help you fill your lunch kits with a little less morning stress.

Joann

you may find me linking up here 

Sunday, September 15, 2013

Laundry Room Face lift - Part 1

As any Mom of three kids knows, I spend a lot of time in the laundry room.  I decided it was about time to make it work better and look better.

Here are some before pictures.


I really didn't stage this.  This is typically how bad it looks!


Yes, it needs some work, but it also had some things that have been working well, like the four laundry bins I use for sorting.  Ideally, I would like the washer and dryer beside each other (or at least on the same wall), but when we were building the house they determined there were too many turns in the dryer vent hose to pass inspection if it was beside the washer and by that time, the plumbing was already in for the washer and sink.  We decided on this set up, and it works okay - not ideal but things could be a lot worse.

We've been in the house 8 years now, but making the room 'prettier' hasn't really been high on the priority list.  I decided it was a small job and I knew I could pull a lot of unused items from around the house, so could also be a very cheap face lift.   The idea for the room started with this basket that I won in a raffle draw.  It was filled with lots of pampering items which I've enjoyed, but I had yet to find a spot for the basket itself.  I dawned on me, it would be a good starting point for my laundry room.  The walls, like almost everywhere else in the house are Benjamin Moore's Clarksville Grey, which is I think of more as a green than grey, even though that doesn't show in the photos.  It and the counter tops worked with the basket, I just needed to add in a little more color somehow.


I decided that since our front-loading washer always has the door wide open, preventing the door to the laundry room closing, we may as well remove the door to the room.  The laundry room opens onto the mudroom which has a door to the hall, so it wasn't critical to have a door anyway.

One of my biggest pet peeves in this room is my husband's habit of hanging his sweaty workout clothes on the top of the door, the open washer door, the fabric laundry baskets, etc. etc.  He comes home with his sweaty gear too late to do a load of wash so he spreads them out all over the place to dry.  Not a great sight to look at :).

I figure I could get this done in about a week if I focus - which I admit is not always easy for me :).

I decided to start with the door and the larger wall I would gain by removing the door, which after about an hour of effort, now looks like this:


I found the cute printables at Thirty handmade days, spray painted some old frames brown and found some large grey clothes pins in the $1 spot at Target.  I attached the wooden clothes pins using some Command Strips that I had on hand and they seem to be holding up quite well after a week's worth of use.


The ironing board and the holder were down in the basement storage room since I didn't have room in the laundry room before.  This works so much better.  Not that really iron regularly, but there are those few instances I need to.  The pins cost $5 total, the new ironing board cover was $10 at Walmart, the can of spray paint $6, and everything else I had on hand or printed off.  Pretty cheap so far and I have some other cheap ideas I need to finish up with this week.


You may find me linking up at the parties listed here 


Monday, September 9, 2013

Organizing acrylic stamps

I used to be an avid scrapbooker and cardmaker, but life kinda took over.  I stashed all of my supplies into the spare room closet and cabinets and haven't touched them for a couple of years.  There have been times when I wished it was more accessible so I could make a quick card, but the thought of digging through everything was overwhelming and I'd go out and buy a card.

Today, I realized I need a card for tomorrow and I could either drive to pick one up or get off my rear end and organize my supplies so I could make one.  Of course, after an hour or two of digging through my stash I realized I could have driven to the store and back a few times :).  Oh well, I'm now set up for next time - and I did make a quick card as well so I'm set for tomorrow's party.

I decided the best plan of attack was to ignore all the 'fancy' tools and supplies and just get the basics organized.  I put all of those items (tape runner, trimmer, etc,) in one bucket and then started on my stamping supplies.  All of my ink pads and pens are already accessible in a iris cart and although the stamp sets were in one place, they were just thrown together.  The bucket I have been storing them in has wheels and it's the perfect height to slide under the lowest shelf in the closet so I didn't need a new container, I just needed to organize this one.

Here's the before:


I decided they needed to be categorized so tried doing only that but they didn't seem to fit well enough to stay where I put them!  The idea came to make some cardboard dividers. Out to the recycling bin I went and dug out some cardboard boxes.  Of course I gathered the duct tape and utility knife - essential tools for most projects, and set to work.  I rigged up some very crude dividers which didn't look too pretty, but I knew I had some shelf liner I had picked up at the dollar store and not put to use yet.


I then used my trusty label maker and some colored cardstock to make some labelled dividers and categorized the sets.


I also included a bucket that holds the stamp blocks, cleaner, small scissors, and tape runner.  I'm now all set to make a quick card when necessary!


Now off to pinterest to find some quick card making ideas!!

link parties you may find me at:  Link parties

Where you may find me linking up

There's so much to learn about blogging!!

I've been on a very steep learning curve the past week and one thing I've definitely learned is that in order to be 'seen' you've got to participate in link parties.  Here's the list of places you may find me:

Monday:

Give Me the Goods Link Party
Monday Funday
Made by You Monday @ skiptomylou
Motivate me Monday @ keepingitsimplecrafts
Make the Scene Monday @ alderberryhill
http://www.craft-o-maniac.com/
Frugal Crafty Blog Hop
serendipityandspice.com
madincrafts
Inspiration Monday @ishouldbemoppingthefloor.com

Tuesday:

Show Me What you got @ Not just a Housewife
Tutorials & Tips Link Party @ HomeStoriesAtoZ
Time To Sparkle @ the Gunnysack
One Project at a Time @ a Bowl Full of Lemons
The Inspiration Exchange


Wednesday:

Work It Wednesday
Lovely Ladies Linkup 
Wow Me Wednesday
Whatever Goes Wednesday


Thursday:


Friday:

Thirty handmade days
Link Party Palooza
Flaunt It Friday


Weekend:

DIY showoff
Get Schooled Saturday
Its overflowing
Saturday-show-tell @ Cheerios and Lattes
Show & Tell Saturday @ Be different act normal
Strut Your Stuff Saturday
Sunday Showcase Party


Month Long:

Organize It! link party


Sunday, September 8, 2013

Using suitcases as storage

Why did I not think of this sooner????

I was storing all of these suitcases - don't ask why a family of five needs this many suitcases, that's another post entirely - AND I was storing shelves of blankets and sleeping bags AND I was storing buckets of off-season clothing.  WHY did I not think to combine these and save a lot of storage space????


My husband travels frequently and likes to have some suitcases easily accessible in the master closet and a few sizes.  We had not only a few suitcases but also packing cubes and such and carry on bags in the closet taking up very valuable space.


In the storage room we had the larger suitcases, a duvet that we only use during the winter, sleeping bags and the extra blankets we use once or twice a year when we go camping.  They were all stacked on shelving unit.  The first thing I did was collect all of the suitcases and decide which few to store in the Master closet and which to store in the storage room.  I then printed off some cute labels from here at justagirlandherblog.  I decided to attach them to the suitcases using rubber bands so they would be easy to attach and remove when we needed to use the suitcases.


The carry on bags went into one of the suitcases in the Master closet, the packing cubes and such into another, and the remaining two have my off-season clothing.  I want it to be easy to take my clothes out when we need to use the suitcases, so used some storage bags that I purchased quite awhile ago and never used.  Each of the suitcases have two of these bags so easy to just pop out.


By doing this I gained 2 shelves in the storage room and about three extra feet of shelf space in the closet, as well two less buckets of clothing to trip over in the storage room :).  Not necessarily 'pretty' storage but a great way to gain some extra space. 


You may find this post here:  Link Parties


Monday, September 2, 2013

Oh SO good muffins............and healthy too!


Back to school means stocking the freezer with items for breakfast and lunches to make the morning run smoother.  We have always been a fan of chocolate chip pumpkin muffins but the recipe I used to use had a LOT of sugar and a LOT of oil in it, so I haven't made them for awhile.  I decided it was time to create a healthier alternate.  I combined a few recipes I found online, tweaked things a little more for our liking and came up with this - probably the moistest muffin I've ever made.  Yes, there is still a lot of sugar and oil, but at least they are healthier versions than in my old recipe.


Chocolate Chip Apple-Squash Muffins

3 cups whole wheat flour
1 cup brown sugar
3 tsp pumpkin pie spice
1 1/2 tsp baking powder
1 tsp baking soda
1 tsp salt
4 eggs
1 cup unsweetened applesauce
1 cup liquid coconut oil
1 1/2 cups pureed steamed squash or canned pumpkin puree
3/4 cups chocolate chips

Preheat oven to 350 degrees.  Line or spray muffin tins.
Stir together dry ingredients.  Make a well in the center and add eggs, applesauce, oil and squash.  Mix until just combined then fold in the chocolate chips.
If using mini muffin tins, bake for 12 min.  If using regular sized, bake for 20 min.
I was able to make 1 dozen large and 3 dozen mini muffins.

note:  I used a butternut squash that I peeled, diced, steamed and pureed while still warm.  I then refrigerated it overnight before using in the recipe.

My kids devoured them so fast I already have to make some more!